-
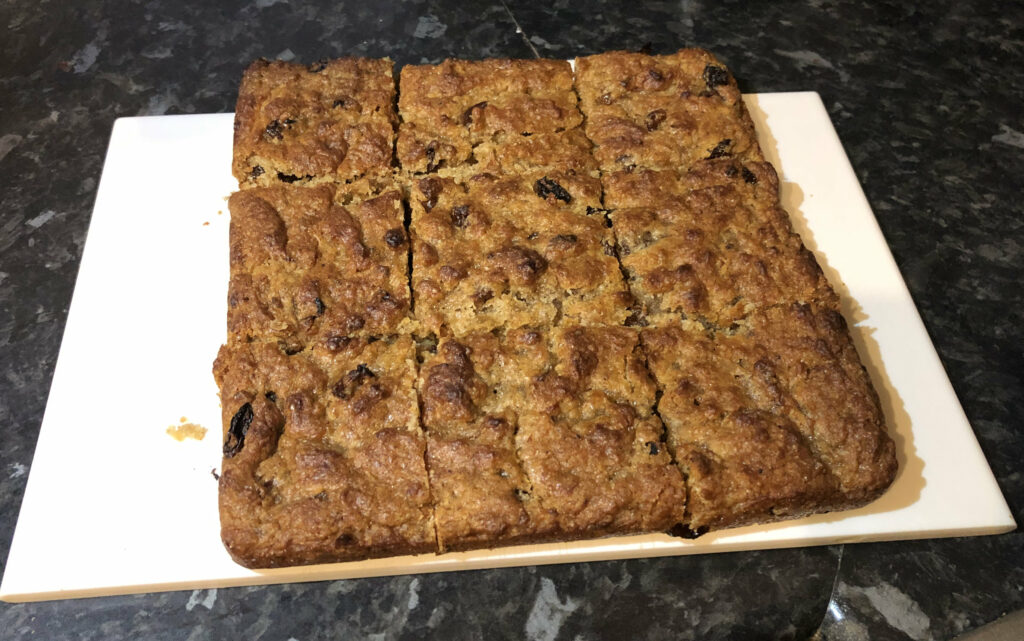
Vegan Mincemeat Blondies
Hi everyone! Sorry this week’s recipe is a little late, I had a very busy weekend! These festive delights are a vegan twist on one of our family favourites! These blondies are truly more-ish, with the fruity spices from the mincemeat and the zesty orange flavour. Don’t over-bake these to ensure that gooey, soft texture in the centre.
Servings: 9
Freezer Friendly?: Yes
Does It Keep?: 4-5 days in an airtight tin
Ingredients:
- 1 1/2tbsp Ground Chia Seeds
- 4 1/2tbsp Water
- 125g Dairy-Free Block/ Butter
- 210g Demerara Sugar
- 3/4 tbsp Vanilla Extract
- 165g Plain Flour
- 3/4 tsp Baking Powder
- 1/2 tsp Fine Sea Salt
- 1tbsp Mixed Spice
- 1/2 tsp Ground Cinnamon
- Zest of 1 Orange
- Juice of 1/2 an Orange
- 200g Vegan Mincemeat
Method:
- Place the butter in a saucepan over medium heat until it has all melted and is bubbling. It should turn a deep amber colour.
2. Pour it all into a large bowl to cool. Whilst waiting for it to cool, line a 22x28cm baking tin with baking paper. Heat the oven to 190°C ( 374 degrees f).
3. Zest the orange and put it into a small container for a while. Make the egg substitute by putting the chia seeds in the water for a few minutes and stir it. Keep stirring until it has an egg – like consistency.
4. Measure the sugar into the butter mixture and combine. Then add in the chia seeds and mix again. Stir in the vanilla essence.
5. Tip in the flour, baking powder, salt, spices, orange zest and the orange juice. Begin to fold. Finally, stir in your vegan mincemeat.
6. Transfer the blondie batter into the tin and make it even. Bake for 20-25 minutes, or when a skewer comes out clean. It should be a golden brown colour.
Made this Recipe?
Leave me a message in the comments to tell me how it went!
-
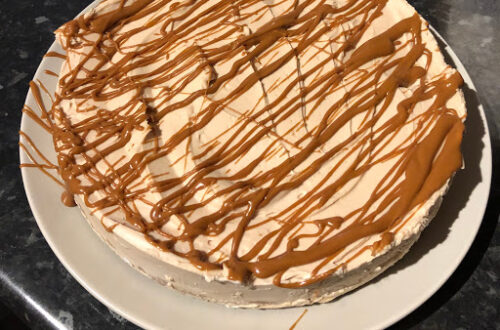
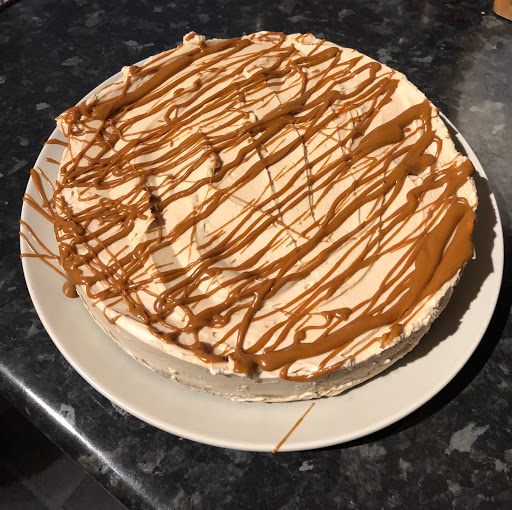
Vegan Biscoff Cheesecake!
A tasty treat for all the family! My Vegan Biscoff Cheesecake has a delicious crumby base, yet a creamy top! I chose to decorate mine with 25g of melted biscoff spread, that I drizzled with a spoon. This was specially requested as a recipe from a family member of mine, and it came out better than I thought!
Servings: 8 slices
Freezer Friendly?: No
Does it Keep?: for 2-3 days if in fridge
Ingredients:
For the Base:
- 200g Biscoff Biscuits
- 80g Melted Vegan Butter/Spread
For the Cheese Filling:
- 700g Vegan Cream Cheese
- 150g Biscoff Spread
- 50g Caster Sugar
Method:
- To make the base, crush the biscuits in a sealed bag, using a rolling pin. Then combine with the melted dairy-free spread. Press the mixture into the bottom of an 8″ Round Spring Form Tin and put in the fridge for 20 minutes.
2. For the topping, measure out all the cream cheese, sugar and biscoff spread into a large bowl. Beat them together with an electric whisk and spread the mixture over the base.
3. Put in the fridge for at least 1 hour, so that the topping sets. If it’s not setting quick enough, put it in the freezer for a little while.
Made This Recipe?
Leave me a message in the comments to tell me how it went!
You May Also Like

Lemon Cupcakes
-
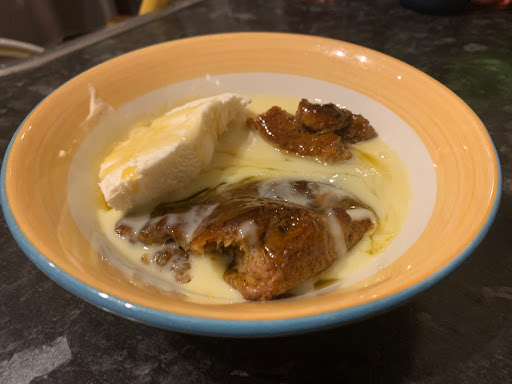
Vegan Sticky Toffee Pudding
A delicious treat for after a great meal! Goes well with Custard, Ice-cream or both!
Servings: 6
Freezer Friendly?: Only the Pudding
Does It Keep?: For 2-3 days if in fridge
Ingredients:
For the Pudding:
- 100g Dairy-Free Margarine
- 100g Demerara Sugar
- 200g Pitted Dates
- 200g Self-raising Flour
- 1tbsp Vanilla Essence
- 200ml Almond Milk
- 1tsp Baking Soda
For the Sauce:
- 200g Dairy-Free Margarine
- 400g Demerara Sugar
- 100ml Almond Milk
- 1tsp Vanilla Essence
Method:
- Preheat the oven to 180°C (356 degrees F).
2. For the pudding, in a large bowl combine the Margarine and Sugar. Chop the dates as finely as possible and add to a pan with the milk and vanilla essence.
3. Simmer for 5 minutes, then use a fork, spoon or potato masher to crush the dates so that they become soft. Leave to simmer for another 3-5 minutes.
4. Add the pan mixture to the margarine mixture and stir. Then add the flour and baking soda and stir again. You want the consistency like a soft peanut butter.
5. Line a backing dish (around 28 x 22) with a little margarine and some baking paper. Pour in the mixture and spread out evenly. Bake for around 30 minutes.
6.To check if the pudding is baked all the way through, put a toothpick through the middle; if it comes out clean its done. Leave to cool.
7.To make the sauce, add all of the ingredients to a pan. Heat on med-high heat, or until the butter has melted and the sugar dissolved. Bring to a gentle simmer and leave it for 3-5 minutes.
8. Make holes randomly on the pudding with a toothpick to help the sauce soak in. Pour half of the sauce over the pudding, spreading it evenly. Serve in a bowl/ plate and put in the microwave for 1-2 minutes. Pour over a bit of extra sauce on each one.
9. Its ready to eat! We had ours with Vegan Custard and Vegan Ice-cream.
Made This Recipe?
Leave me a message in the comments to tell me how it went!
-
Vegan Chocolate Mug Cake
A quick chocolate snack, perfect for any cold day! It has a brownie-like taste, yet a cake texture. I made 3 – One for me, one for my vegan and one for another non- vegan. We all loved it, vegan or not, and it doesn’t taste like its vegan at all! The great part is, it doesn’t take any extra bowls or cutlery, as you make it in a mug, and use a fork to whisk and eat it.
Servings: 1 mug
Freezer Friendly?: No
Does it Keep?: Only Edible When Fresh
Ingredients:
- 2 tbsp Vegetable Oil
- 2 tbsp Water
- 2-3 drops Vanilla Extract
- 1 pinch Salt
- 4 tbsp Caster Sugar
- 2 tbsp Cocoa Powder
- 4 tbsp Self-Raising Flour
Method:
- In a mug, add the water, oil and vanilla extract. Whisk well.
2. Add in the cocoa powder, whisk with a fork, then add the sugar and flour and whisk again. The batter should be the same thickness as cupcake batter.
3. Put in the microwave for 60-90 seconds, or until the centre is molten but the top looks like a sponge. Be careful not to overcook.
4. It is ready to be consumed as soon as out of the microwave, but may need to cool down. Please note this is meant to be consumed warm.
Made This Recipe?
Leave me a message in the comments to tell me how it went!
-
Vegan French Toast
A delicious start to the day, perfect for brunch, or a quick breakfast for two. It’s sure to be a crowd pleaser at any sleepover breakfast, or a family gathering. The cinnamon in the bread a flavoursome kick, depending on how much you put in. My Vegan is a lover of cinnamon, so I put in a lot. I also used ground Chia Seeds, just to make it look less of a vegan concoction and more like a normal breakfast. This is handy for people who eat with their eyes, but is optional. You can use any type of bread you want, but we used Tiger Bread
Servings: 2 slices
Freezer Friendly?: No
Does It Keep?: Best When Fresh
Ingredients:
- 1 tbsp Chia Seeds
- 1/4 tbsp Maple/Pancake Syrup
- 1/2 tsp Vanilla Extract
- 60ml Unsweetened Almond Milk
- 3/4 tsp Ground Cinnamon
- 2 Slices of Bread
Method:
- Combine all the ingredients in a small bowl. Put it in the fridge to activate for 10-20 minutes, or until the mixture thickens.
2. Put some oil in the pan/griddle and heat it up. This means the bread should sizzle when it goes in. We cooked ares at around 177°C (350 degrees F) which is Medium Heat. Pour your batter mixture into a moderately flat bowl or a plate with higher sides than its base.
3. Slice your bread, if it isn’t already, and lie it down in the batter with one side facing up. Let the bottom side soak it in, whilst you spread some of the mixture around the top with a spoon. After 30 seconds, flip over the bread and repeat the process. If your mixture is running low or is too thick, just add some more almond milk. Repeat this process for the other slices of bread.
4. As soon as the bread is soaked all the way through put it in the pan/griddle. Cook until golden brown, or brown depending on how you like it, and then flip. When both side are cooked put on a plate whilst you cook the next one.
5. You can eat these with any toppings you want. I went with maple syrup and blueberries. I also served them with sausages.
Made This Recipe?
Leave me a message in the comments to tell me how it went!